


Stuff We Use: What’s the Best Garage Floor Epoxy?


On our never-ending quest to improve this place by listening to feedback from the B&B, we are taking a new tack with these product posts, choosing instead to focus on items we use and have purchased with our own meager income. After all, if we’re giving you the truth about cars, we ought to give you the truth about car accessories.
For those of you fortunate enough to have a covered area in which to work on yer prized classic cars total hoopties, it makes a lot of sense to apply a dash of protectant to the floor of that space – especially if it is hewn from concrete. Here’s our pick in the world of garage floor epoxy.
This product from Rust-Oleum has been around for some years but marks the second time I’ve used it on a concrete garage floor. Very affordable and easy to apply, this epoxy is designed to protect the surface while making it easy to wipe up the likes of oil or brake fluid – stuff that would normally seep into concrete somehow and leave a stain.
There are two components to the product, with a pair of fluids that are to be mixed together in order to create the paint-like liquid which will dry into a hardened epoxy. The last time I used this brand, about 15 years ago, the fluids were shipped in separate paint cans and needed to be measured and then mixed. This time, some genius at the company figured out they could put both fluids in one plastic bag, separated by a thin membrane until ready for application. All the user needs to do is gently squeeze the bag to break the membrane, allowing the two liquids to mix, and then shake the bag for a few minutes. It’s a rare case of positive advancement in a product. There were two of these bags in the box, since it was for a double garage, making it convenient to mix up just half the product at a time.
Rolling it on is no more difficult than applying regular paint; just be sure to get in all the corners and don’t make a mess on the wall. Since it is an epoxy, it does need to be applied within a certain amount of time after mixing, so don’t start and then bugger off to watch a football game. I used simple household painting tools like trays and rollers. Make sure to stay off the place for a few days while it is curing.
It is required to have a clear space when applying this stuff, necessitating the rude shoving of all my possessions to one side of the garage while laying down the epoxy on half the area. This approach worked well and allowed me to bin some ridiculous items onto which I had been hanging for far too long. Call it a forced purge. Obviously, the ideal scenario is to apply this stuff when the garage is completely empty – a week or two before I moved in five years ago would have been ideal. Perhaps next time.
A clean surface is important for the epoxy to stick, so more than a few minutes were spent loosening and removing a previous coat of paint that was flaking off the floor. After all that was swept away, I took the time to patch up some crumbling areas of concrete near the opening for the overhead door. Making sure to have a decently clean surface is critical, though I question the need for so-called etching with a caustic solution.
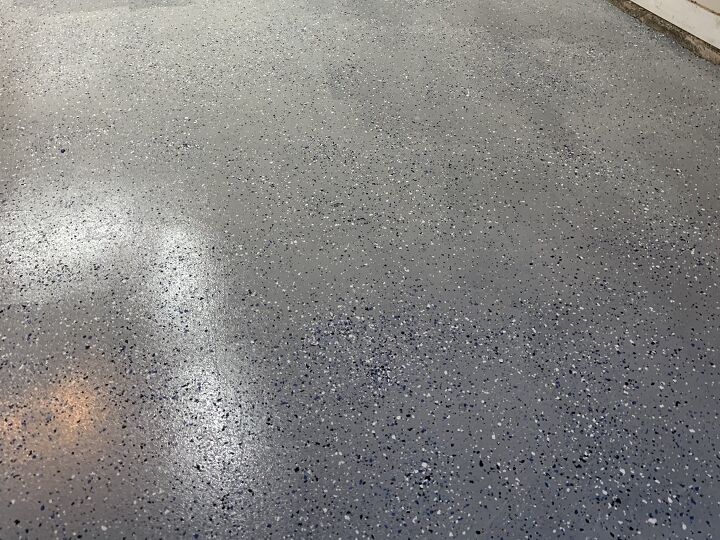
The space shown here is roughly 24’ x 24’, about typical for the two-car attached garage found on decade-old suburban homes in this neck of the woods. The box for this epoxy promises enough coverage for such an area, and it delivers on that guarantee, though the sad-sack package of decorative color chips is absolutely pathetic in size. As with the last time I used this product on a 1.5-car garage, it was useful to purchase an extra packet of chips in order to get a decent broadcast of the things over this floor. If you’re unconcerned about that part of the process, carry on. I like the chips for their appearance, giving the place a bit of visual interest while looking slightly like a car dealership from the ‘80s. Just scatter the chips around by hand as if you’re feeding chickens and they’ll stick just fine into the wet epoxy.
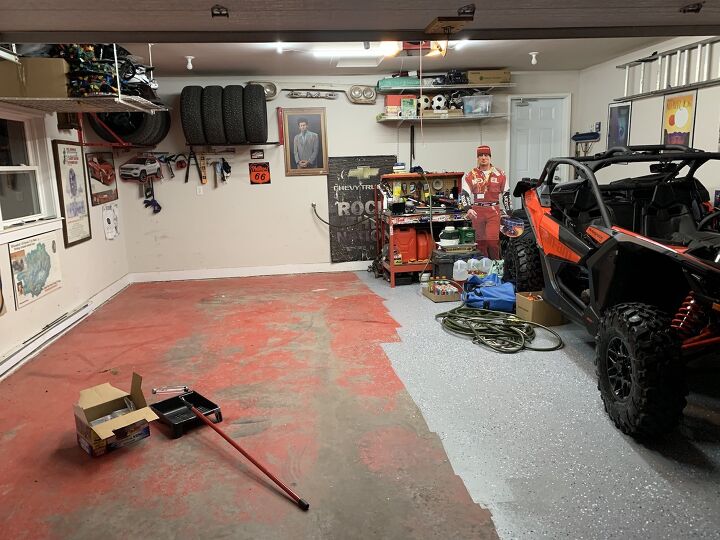
One hiccup in my application of this stuff is noticeable to anyone who’s particular (raises hand). Since I did the floor one half at a time, there’s a decently visible line where the two halves meet. This is thanks to those decorative chips since my addled brain thought it best to scatter them heavily in that area to help it blend together. Here’s the problem: the first half was (obviously) long since dried and cured while the second half was still wet, meaning the extra chips only stuck to one side. Facepalm moment. Learn from me, just use a normal amount of decorative chips, and it’ll be fine.
A year after installation, the product still looks good as new and had proven valuable in making it easy to clean up spills. Grip on the soles of shoes is fine, even when wet, and there’s no pickup of the stuff on tires as there was with the simple red paint which was there previously. Two major thumbs up.
As planned, this series of posts will continue to focus on items we’ve actually used and bought with our own money. We hope you found this one helpful.
[Images: The Author]
Become a TTAC insider. Get the latest news, features, TTAC takes, and everything else that gets to the truth about cars first by subscribing to our newsletter.
Matthew buys, sells, fixes, & races cars. As a human index of auto & auction knowledge, he is fond of making money and offering loud opinions.
More by Matthew Guy


Comments
Join the conversation
Useful article. Thank you. I don't get the glitter, but whatever.
Do you park daily vehicles in your garage or just weekend toys? I ask because in my garage, one side is the weekend toy, and the other side is the family daily driver. When we bought our house, the previous owner put down cheap garage floor paint which looked great for about 5 minutes after we moved in. As soon as we started parking in there, the hot tire tracks and water and snow dripping off the daily had the floor flaking up like crazy. Now its completely back to concrete in most areas. I really want to redo it because it looks pretty bad now but want to be sure its worth the time and money and wont start coming up just like before. Thoughts?